
MEMENTO WebEditor
MIDI not initialized

Flow

Click a flow to make it active on the device. Click a block in the diagram to open its settings. Solid = active, dashed = inactive; amber = reverb sends and return, Σ = where the reverb comes back. Manual ↗

Sources → destinations matrix

Same matrix as the device's ROUTING screen; the REVERB column feeds the reverb tail. The level under each OUT cell is how much of that source you hear (delay, texture and reverb always get the full source). Matrix, levels, zone order and the filter / Master FX positions belong to the flow. Manual ↗

Filter

The position moves the filter along the path (see the diagram). The PRE/POST button cycles through the positions enabled here (OFF = bypass); at least one must stay on. Saved inside the flow (FLOW EDIT → SAVE), like the matrix; a global preset carries its own copy of the flow. Manual ↗

Master FX

LINK (default): the Master FX sits right after the filter and follows it, PRE/POST button included. Pick a point of the path to detach it. Its amount stays on the panel pot. Saved inside the flow (FLOW EDIT → SAVE), like the filter position. Manual ↗

Manage flows — save, rename, delete, new

Up to 16 flows on the device, each with engine, matrix, zone order, buffers and texture settings. A global preset keeps its own copy of its flow. Manual ↗

Library

Flow presets saved in this browser. Load one to edit it; with LIVE on it reaches the device as you load it.
The sound of each block. Texture settings belong to the active flow; delay, reverb and outputs are saved with the global preset; input and noise gate are device preferences. The signal path (matrix, filter and Master FX positions) is in the FLOW tab. Manual ↗

Input & noise gate

Same gate as SOUND → INPUT → GATE on the device, before the chain. Drag the handles on the graph; opening and closing use different time scales. Manual ↗

Texture

Settings of the active flow; only the parameters of its engine are shown. Buffers are tempo divisions: "1" = one 4/4 bar, "." dotted, "t" triplet. "Mod source" rows let MOD 1 / MOD 2 drive that parameter with the slot's AMOUNT knob. Manual ↗

Delay

Delay time and feedback stay on the panel pots. Manual ↗

Reverb

Reverb amount and size stay on the panel pots. Manual ↗

Outputs

Same as the device's OUTPUT screen: each source goes to ALL, 1-2, 3-4, SPIN (rotation inside 1/2) or QUAD (rotation on the 4 speakers). On SPIN / QUAD, speed and distance can follow MOD 1 / MOD 2, each with its own depth. Manual ↗

Pattern

Drag on the bars to draw the volume · click the buttons below for the step type: OFF silence · SHT short gate 25% · LNG long gate 75% · LNK legato to next Manual ↗

Parameters

Audio test

A test note in the browser whose level follows the modulator exactly, as the device will on the destination. It doesn't drive the device's audio.

Library

Patterns saved in this browser. Load one to edit it; with LIVE on it reaches the device as you load it.

Device slots

Save writes the pattern into one of the 8 slots on the device; Import reads all 8 (names and patterns) into the library. Patterns saved from the panel arrive here on their own. Manual ↗

Touch bar — zones × effects

ZONES

Choose the zones, drag effects from the palette onto the bar (up to 3 per zone), then set range, driver (position / pressure) and release (HOLD / RETURN) below. Manual ↗

Foot pedals & CV inputs

As on the device's FOOT screen and CV IN menu. Changing a pedal's mode clears its assignments; wiring and calibration stay on the device. Manual ↗

Library

Touch presets saved in this browser. Load one to edit it; with LIVE on it reaches the device as you load it.

Device slots

The touch preset slots on the device: Import one into the editor, Recall it on the device, Save here the editor's setup, rename or erase. Manual ↗

Backup

The library's touch presets as separate files, or one file to restore. Import the device slots above to include them.

Touch monitor — live from device (MPE)

Shows your fingers on the bar in real time: position, pressure (circle size) and MPE note. Needs MPE OUT on the device (the button above enables it) and a USB MIDI connection.

Library

A global preset is the full patch: sound, flow and the current sequencer and touch settings. Saved in this browser, exportable as a .mmtp file. Manual ↗

Device slots

PANEL (no preset: the pots play live) and the 20 preset slots on the device, active one marked. Recall loads a slot (on PANEL it frees the pots); Save here stores the device's current state into it (send the editor patch first); File saves or restores a single slot. Manual ↗

Backup

The library's global presets as separate files, or one file to restore.

Firmware update

Loading…
  1. On the device: MENU → UPDATE → press MENU again. The screen shows a warning and then goes dark: the device is in update mode.
  2. Connect the device to this computer with a USB cable (no hub), click CONNECT and choose Daisy Bootloader in the browser window.
  3. Click UPDATE and wait for the bar to finish: the device restarts by itself with the new firmware.

Do not unplug the device or close this page until it has restarted. Needs Chrome or Edge (WebUSB); on Windows the device may need the WinUSB driver. The MIDI port above is not used for the update.

Other versions

Select an older version to go back to it.

Controller update — Touch Bar pressure

This update improves the pressure resolution of the Touch Bar. It is loaded over WiFi from the device's own update page, no USB cable needed.

UI v8 memento-ui-v8.bin · 1.2 MB · build 2026-09-21
  1. Download the firmware file: ⬇ memento-ui-v8.bin
  2. Switch the device on while holding SHIFT.
  3. Once it has started, press MENU and choose SET IN → CTRL OTA.
  4. On your computer, join the WiFi network MEMENTO-UPDATE, password memento1234.
  5. The update page opens by itself (if it does not, open http://192.168.4.1/ in the browser).
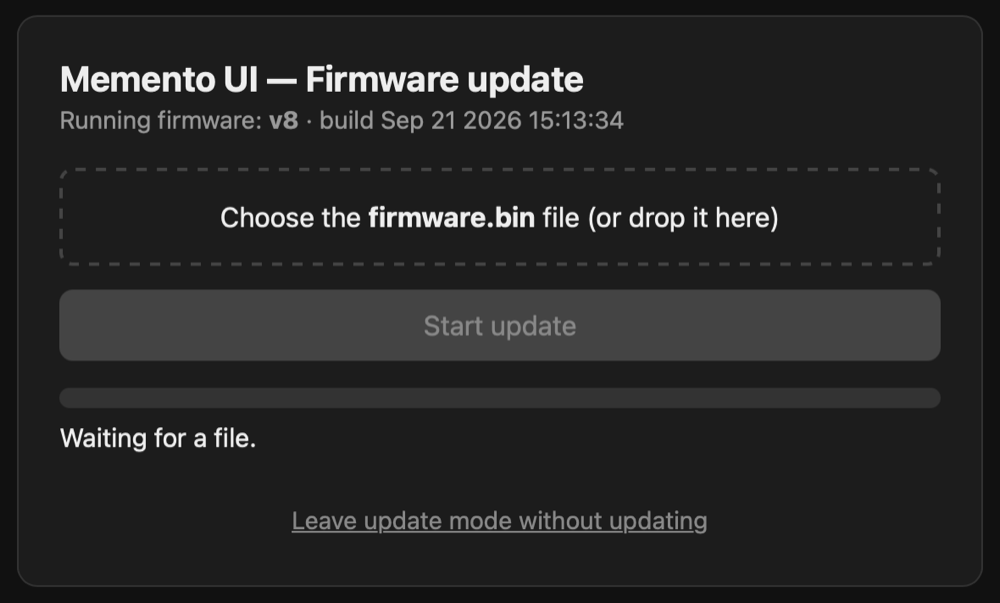
    The controller's update page: a box to drop the firmware file, the Start update button and the progress bar
    The update page shown by the controller. The version currently running is shown under the title.
    Drop the downloaded file into the box, or choose it, and click Start update.
  6. Wait for the progress bar to finish. When the update is complete the WiFi network disconnects by itself.
  7. Switch the device off and on again.
  8. Redo the Touch Bar calibration (MENU → TOUCH → CALIB): the values saved before the update are no longer valid.

Do not switch the device off or leave the WiFi network while the bar is moving. The device screen shows the progress too.